Saturday 29 January 2022

Russian Houses

These village houses are the first instalment of a series of Russian buildings I made about eight years ago. My late friend Mark Sturmey was building up 17th century Polish and Turkish armies, so we wanted something for them to fight around. Now you may be thinking "Poland, Turkey, they're not Russia are they?" But in the 1600's the Polish-Lithuanian Commonwealth was the superpower of Eastern Europe, covering the modern states of Poland, Lithuania, Latvia, Byelorussia, Ukraine and Moldova. So there's an excuse. Plus we were thinking they would do for other periods: the Great Northern War, Napoleonics, Russian Civil War, World War II even. So here we are.

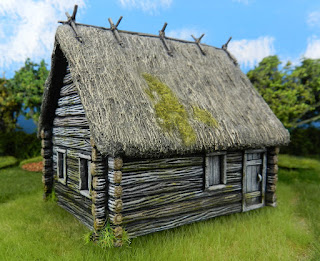
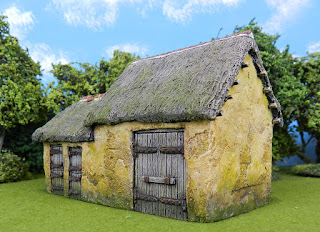
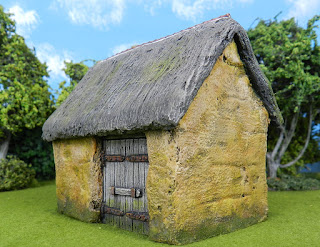
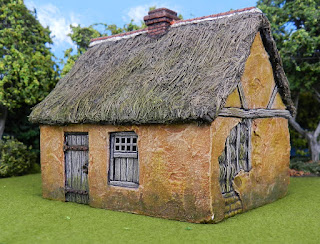
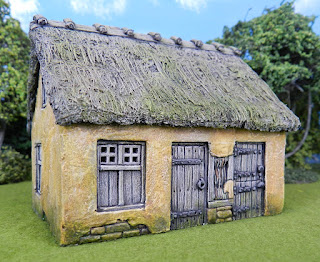
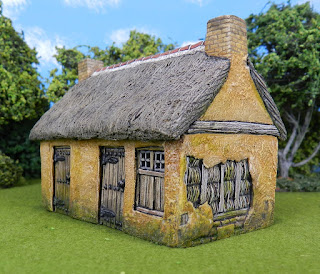
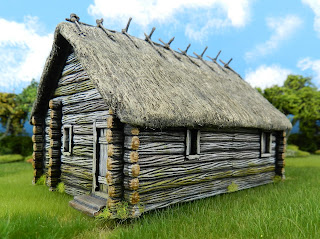
Houses in many area of Russia were based on the log cabin approach to walling with thick, rough thatch roofs. Although I'd discovered "teddy bear fur" as a neater method of making thatch by this time, I chose to go back to using plumbers' insulation felt to get the crude sort of roof that old photographs show.

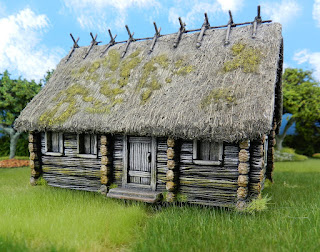
The walls of these houses were made by converting, or mashing up, plastic kits produced by Pegasus Hobbies of California: Buildings & Accessories - #7703 1/72 Russian Log House Pegasus Hobbies, 909.982.6507, Info Pegasus Hobbies, 909.982.6507  They do three variants, all useful here. They are classed as 1/72 scale, but are plenty big enough for 28mm gaming in my book. Plastic kits can often be incorporated into more authentic models, sometimes in a different scale from the one they were meant for, so I try to keep my eye on what is around. I covered the 20th century style window glazing bars with closed internal shutters, so they would be more suitable for earlier periods as well.

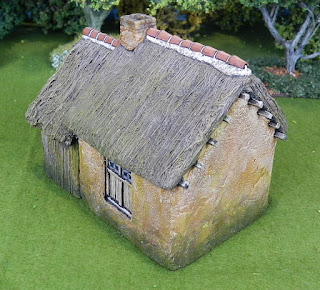
The ridge-poles were some sort of twig for the horizontals, but the uprights made of the same broke immediately and had to  be replaced by plastic rod. And then broke a second time and had to be replaced by brass rod! They are tied together with string, representing rope. At the bottom ends I think I used flexible wire, poked and glued into drilled holes.

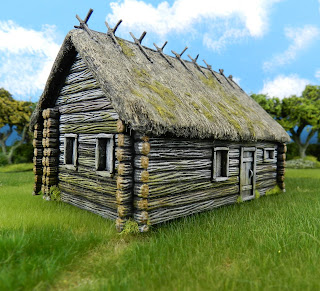
Moss on the roofs was made with very short static grass, PVA'd on then painted and drybrushed. Moss can be all sorts of colours of course, but you want to avoid too great a colour contrast with the thatch, because it looks garish. It's easy to google images of moss on thatch and see what looks nice.


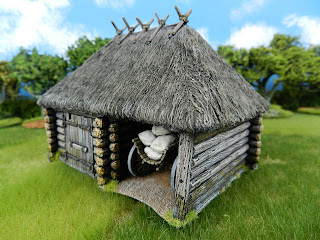
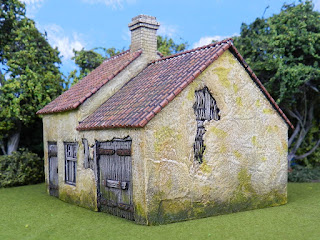
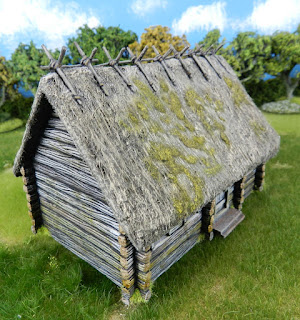
The last of these buildings is a barn and cart-shed. In this case I built the walls from scratch using balsa dowel and aiming to blend with the plastic walls of the other buildings in terms of style and colour. Hopefully you cans see the texture of the logs is a little bit nicer than the plastic ones. The cart is from the Perrys Napoleonic range. 


You have possibly noticed this useful barn door casting in several of my projects over the years. This might be the opportunity to share another point of "vernacular building lore": The doors of dwellings usually open inward, for security reasons, so the hinges are on the inside, but doors on barns, sheds, stables, byres and other agricultural spaces always open outwards. Hence the hinges and any system of fastening are on the outside. (The main reason such doors don't open inwards is that they would reduce the available space within, and a loose animal or collapsed storage item, say, might obstruct an inward opening door.)

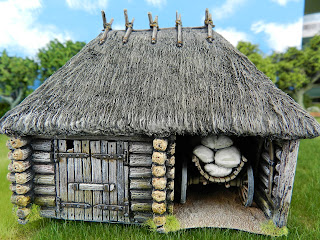
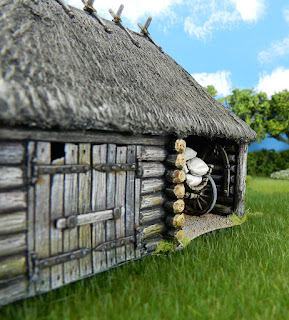
On this picture you can see the yoke hanging on the side wall. Russian wagons commonly used three draft animals (a "troika"), with the middle one's harness incorporating a wooden yoke. I didn't want to throw away any more of this lovely cart model than I had to. 


Thursday 27 January 2022

A Photographic Backdrop Board

Having got myself a half-decent camera, I decided to build a board with a ground surface and sky backdrop, on which I could place models to photograph. My idea was that the "sky" would be on a board which would stand up in a slot at the back and the join would be hidden by a line of bushes. Like a lot of our projects, this took a good deal longer to realise than expected. But here it is at any rate. We'll very shortly have some pictures of the Russian buildings I have since photographed on it.  

Here's the board, which is built on a sheet of hardboard, first covered with filler plus a bit of PVA, covered in sand and grit and then painted and drybrushed to give some impression of earth. I wanted to get the impression of the "patchwork" of crops that was typical of the pre-modern battlefield. You can see the board curled up a little at the front corners, though that won't show on the finished photos. 

Now from a low angle. I covered it with static grass in different colours, different mixes and using different methods. I'm not a big fan of expensive tools, but I did treat myself to a "Super Power Grass Applicator" from the Italian firm of Diorama Presepe (link added to my list). It set me back about £120, but it's certainly powerful ( 40volts) and rather satisfying, so long as you don't mind the odd little electric shock from the powerful build-up of static electricity. 

The slot, made from two battens screwed to the hardboard. It's concealed by bushes made from rubberised horsehair. I was learning the knack of using static grass here. Some fields came out nicer than others, such as the nearest one came out with its nice blend between colours.

Here you can see what the whole thing look like with a sky backdrop slotted in. I tried to paint a nice new sky, but when I found you could buy one for the purpose for only a few pounds it seemed a better option. The downside of buying the cheapest one though is that it has to find its way here from China (via slow boat it seems), so I'm temporarily having to use my old sky board from 1989.

Now from a low angle with suitable cropping of the photo, you get the picture of how it's supposed to look. The main thing with using long static grass and a powerful applicator is that it looks realistic and pleasingly lush. I modelled some flowers growing in the fields but kept it very low key because garish clumps can ruin the natural effect.

I planned to use a line of trees to further blur the join between board and backdrop, but I'm not sure it adds much in practice. The bases stand out because of the "dead leaf" covering, and we see the downside of tall static grass as a board covering: bases placed on top "float" a few millimetres above the actual board rather than blending in, certainly when viewed from this low angle. Figure bases would presumably do the same. It might not be so noticeable from the normal angle as we sit or stand well above the board. 

Monday 17 January 2022

La Belle Alliance

The last of my Belgian buildings is the inn of La Belle Alliance as it stood at the Battle of Waterloo. The model is slightly "condensed", but not as much as you might at first think. There are many near-contemporary images of this place, mostly showing various upward and sideways extensions built after the battle. But this one was painted by a local amateur artist who actually visited it two days after the battle. For the back of the building I had to rely on later images, but this is as good as contemporary source material gets.


The name of the inn by the way "La Belle Alliance" referred sarcastically to a wedding in the eighteenth century, when a pretty local girl had been married to a businessman who was wealthy but ageing. Perhaps the jealous proprietor of that time fancied he would have made a more appropriate match himself?

Before showing you the pictures, I couldn't resist passing on this surprising written description by two Englishmen who visited the site in July 2015 - and still weren't the first tourists to on the historic scene:

Our travellers now crossed over to La Belle Alliance, which proved to be a hovel of the meanest kind, consisting of four rooms, a passage, and some wretched holes up stairs. There are also some ruinous outhouses, and a well, into which several dead bodies had been thrown. On the gable of the house, the proprietor has painted in large and rude black letters, on a whitewash ground, "Hotel de la Belle Alliance." Near this spot Wellington and Blucher met; and the people show a straw- bottomed chair, on which it is said the former sat down:—at all events it was the head-quarters of Buonaparte during the battle.

The walls of the front rooms in this public-house were completely scribbled over with names, inscriptions, poetry, and drawings: and the whimsical humour that distinguishes the public character of the English, had not been repressed by the awful circumstances of the situation... A Mr. Thomas Jackson had merely left his name for the admiration of posterity: but some other person had appended the remark, that "he was hanged at the last assizes for sheep-stealing!" The portrait of one of the life-guards had been delineated by some friendly hand, in coal-outline: immediately beneath which some fastidious critic in the fine arts, jealous probably of the honour thus paid, had written the words "ugly theef!"

And now at last some pictures of the model. The techniques and materials were as described in my previous post. I tried to get an undulating roof form, as tiles commonly drooped down over their timber supports. I think I got the effect by heavy vertical scoring on the back with the Stanley knife.


Friday 14 January 2022

Belgian Village Houses

This post shows the main component of my Belgian villages project, the houses and farm buildings. Paintings by the Netherlands "genre" painters such as Teniers and the Breughels provided rich inspiration. I also took account of  contemporary images of the battlefields of 1815 and their models in the Siborne diorama. 

There are a handful of things worth understanding when you look at models, images, or real examples of "vernacular architecture", ie the buildings no architect ever planned. Firstly they had to be constructed from materials available free and very close by, because transport was difficult and expensive. Where timber was plentiful you got log buildings with shingle roofs. Where there was suitable stone, that was used. Where neither was handy it came down to some version of mud walls and thatched roofs (as it still does in the poorest parts of the world of course). 

Secondly, there was slow change over the centuries as techniques developed and some acquired a little more wealth, culminating in rapid change when the Industrial Revolution provided cheap transportation by canal and railway.

Most importantly there was what I call a "hierarchy of building materials", by which I mean that older and poorer buildings used the cheapest and most local techniques, but better, newer, more durable or more ornamental methods precisely reflected the social status of the owner. So for example a landless labourer might live in a dwelling made of mud and straw, his yeoman neighbour in solid timber framing, the prosperous landlord in brick and the church be built of stone. The equivalent hierarchy of roofing materials would be thatch to clay tiles and thence to slates or sheet metal coverings. So here's how this played out in central Belgium:

This barn and stable building is made of what's called "cob" in England, one of the family of methods of building walls from clay-ey mud mixed with chopped straw. A wall was piled a couple of feet high, allowed to dry and then the process repeated, so it rose in courses of a couple of feet each. When it was all dry, the surface was flattened a bit, door and window openings were just cut out, and a coating applied to stop the whole thing dissolving in the rain. This could be a layer of rendering or just coats of lime-wash.  

The surface inevitably degenerated, often showing the division between courses and a distinctive pockmarked surface, both of which are seen on this barn model.

With thatched roofs there are a multitude of local methods of covering the central ridge. In Walloon Belgium the no-nonsense approach was to slap on a load of mortar and then a line of ridge tiles.

One step up from cob construction in Belgium and Northern France was "torchis", a word for which there is no English translation. It was a variant of timber framing, where some wood could be obtained, but too flimsy to support the weight of the building by itself. The method was to build the timber frame as best they could ( hopefully on a stone base as here), fill it in with wattle and then coat the whole thing thickly with a cob mix, inside and out. When dry, this shared the load-bearing function with the woodwork. Unlike normal timber framed buildings, only the thickest beams were left uncovered, apart from where the mud and straw mix crumbled away, as here.

It was common for peasant houses to include a stable/ cowshed, or a barn at one end, rather than them being separate buildings. This particular roof uses a straw-based solution to the ridgeline issue. 

When I got these buildings out to photograph them, it occurred to me that the roof thatch wasn't the best I ever did with the plumber's felt material. It had come out a bit tangled and a bit monotone in colour. Oh well. I try to learn from mistakes like this.

This peasant has gone one step up the building materials hierarchy by having his roof covered with clay tiles, although the walls are still of torchis.

By the time of Waterloo, some buildings were partly or wholly built of brick, with either tile or thatch roofs. Brickwork was commonly whitewashed.

There are half a dozen types of pantile. This variety is generally called "Flemish". It's used in the Low Countries but also the northern parts of France and along the cost of Germany and the Baltic states. Each tile is basically flat, with a lip at one side and a raised channel at the other, which covers the lip of the next tile. Much as I like the Wills plastic materials sheets, they only do one type of pantile, the S-profile version that is common in the East of England, understandably enough. But there is a suitable styrene sheet material for proper Flemish tiles made by Slaters Plastikard. Here's the link:  Slater's Plastikard - EMBOSSED and MOULDED PLASTIKARD (slatersplastikard.com) 

Sadly they only do this one fully 3D sheet, equivalent to the Wills materials. Don't be confused by their other building sheets which are "embossed" or vacuum-formed, so disappointingly flat in appearance. I don't really use those other sheets now, but long ago they served for the walls of my French Ardennes houses, so you can see what they look like there. 


Tuesday 11 January 2022

Two Belgian Churches

Here's the second post showing the newly photographed Belgian buildings I made 10-12 years back. Churches today, houses and a Waterloo landmark to come. I made these to fit two periods that my friends were collecting armies for: the Marlburian period and the Waterloo campaign, but they would be fine for a broader period: the Wars of Religion in the 16th Century, the Thirty Years War and the War of Austrian Succession a century later. The brick or stone buildings such as these churches wouldn't be out of place as late as 1914 or the Blitzkrieg of 1940. In fact the central region of Belgium must have the sad distinction of being more frequently fought over than any other area of Europe.

Anyway, the first church is in one classic style of construction, the pleasing combination of brick with light stone "corners" and "openings". The model was almost entirely made from Wills plastic sheets: brick, tile and even the corner stones. The windows were my resin castings though.


The second church by contrast is built of whitewashed stone. Again mostly Wills sheets, plus my own cast parts for the windows, door and the steeple. Whenever I make some such building part I try to make a mould from it, even if I only want just the one I've built for the model in hand. That way I can cast a few of them when I'm messing about with some resin, and stash them away for future models. I have gradually acquired a sort of library of useful parts. 

When I'm feeling especially virtuous I immediately mould and cast parts I've just made, use the casting and keep the "master". Sometimes the master can be converted for some further part, and if the moulds ever got badly damaged I could remake them using the original master. To be fair however, I find soft silicone moulds used for resin casting hold up pretty well, the key thing being to make sure they are always stored absolutely flat.


Sunday 9 January 2022

Hand Built History is back.

After an interregnum of about a month HBH is back with a new camera and the first photos of our second phase, whereby I photograph the wargames models I have built in recent years. Here's the first of these previously unseen efforts, a windmill from Belgium, (the Spanish or Austrian Netherlands at the time) as it would have stood in the 15th to 18th centuries. Such structures were different only in detail across France, Germany, Holland and Britain over this period. In order to make a realistic model I researched the technology of how windmills worked, which I found fascinating. So I'll try to explain it a bit, picture by picture.

The miller's job was hard work. When his mill was operating he constantly had to turn the entire body and sails to face into the wind, and he had to "set" the amount of canvas stretched across the underlying wooden framework of the four sails. If the wind was high he had to take in sail, or else risk the whole structure shaking or even collapsing. On stormy days he couldn't safely work the mill. When there was little wind he set "full sail" to catch it. The principle was just the same as on a contemporary sailing ship. 

My model is set on less than half sail, as if for for a windy day. The canvas sheets were attached by rings like curtain runners at the inner end, then by hook and eye along their length. A strong rope was stitched in along the trailing edge, and the unused sail was twisted around this, then around the leading edge of the frame and tied firmly at the outer end.

The miller lived in a nearby cottage, not the mill itself, which was full of running machinery. The sails turned a shaft and this power was transferred by cogs and gears to two massive circular millstones inside the structure. The miller poured grain so that it was ground down between these stones, emerging as flour. Full sacks were hoisted and let down by the rope and pulley you see suspended from the top rear.

The model was built out of balsa mainly, with styrene sheet for the metal parts and anything delicate. Each sail was based on two plastic ladders glued together. The sails were made from an old handkerchief, stiffened with thin PVA before being painted.

The whole body of the mill had to be turned into the wind as it shifted, using used the "tiller" you see projecting out through access stairs at the back of the mill. The mill revolved on the central support post, which projected a long way into the enclosed structure.

Surprisingly, the central post didn't touch the ground. Instead the weight of the mill is carried by the diagonal braces which transfer it to the horizontal cross, resting on stone supports at each end. Note the old mill-wheel on the ground. They wore out after years of cereal grinding, and it was customary to leave them by the mill as token of how long it had been in operation.

Around the end of the eighteenth century, new technology made these mills redundant. Windmills now mostly consisted of a stone or brick tower, with only the top revolving. A little sail like the tail rotor of a helicopter automatically aligned this into the wind. And canvas sails were replaced by wooden slats which let strong winds through, thus removing the need to reset the sails as the wind force changed. But less than a century later steam power made the windmill redundant. Restorations and residential conversions of these imposing structures are still to be seen here and there across Europe.