Friday 24 December 2021

Deja Vu in Wargames Illustrated

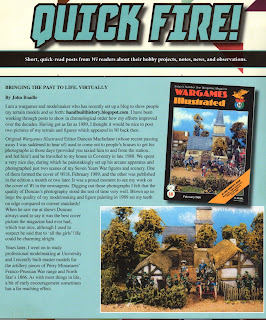
In my post of 18th November, I mentioned that checking copyright permission to use these WI cover photos from 1989 produced a nice request from editor Dan Faulconbridge for a piece in the next issue. No sooner said than done, because here is the short piece we agreed which has now been published in WI 409, the new issue. I suppose it's definitely a sign of having been around for a long time when something you remember doing only a few years ago comes back as a nostalgia-based article! If anyone has found this blog because of the WI piece, welcome, and please leave a comment.

Dan is interested in publishing "how-to" articles from me in future, so that is something I will be thinking about in due course. I'm not sure whether, these days, it's more help to more people to publish such a thing in a magazine or online. Perhaps the answer is both, if we can find a way to do that. 

Anyway, you may be thinking, enough of this fluff, where are the new photographs of scenic models we've been promised for several weeks now? Close, hopefully; I now have a camera, a lighting rig, a neutral background and Phil's shown me how to set it up. Unfortunately I took one look at the controls and the manual for the camera and it was my turn to have a glazing-over of the eyes. But I will knuckle down to learning how to use the beast, just as soon as the Christmas period is over.

Talking of which, Merry Christmas to everyone! It's been a ropey year for many of us, not least on account of the virus. But that's what we have  hobbies for: something creative and interesting to focus on is a good way to cheer ourselves up when there's gloom in the real world!


Wednesday 8 December 2021

The Last Post and the Ones That Got Away

This isn't really the last post from Hand Built History, but it's the last one to consist solely of a bit of written fluff plus images from my desktop archive, because I am all out of them now. However, this brings us to Phase Two  I do have a good few more things I have built which I didn't photograph because there was no "platform", if that's the right word, to publicise them. I wasn't selling anything, my mates saw the actual models, and I had no need and no means to photograph them. I am now broadly set up to take pictures again though, with Phil Olley's advice, and will be experimenting with this during the coming week. Depending how that goes we may have posts of miniature Belgium, Belorussia or Bohemia in a few days time. Get the little "teaser" there, eh!

Today though, here's three images of a German village house I made with and for Phil, whose Imagi-Nations set up you will know about. My idea was that I was going to show him how quick and easy it really was, he would help in this and then fly off to make his own buildings. But we spent a couple of long evenings making this and then another long evening just starting to paint it, and I could see Phil's eyes glazing over a bit! Really it was a daft idea to start with a timber-framed building, because they are time-consuming to make and fiddly to paint. So I finished it off myself, presented it to Phil earlier this year and in no time he had photographed it as part of the "fairy-tale Germany" over which his Vaubarians and what-not campaign so winsomely.

Before you get to the pictures though, I wanted to mention, or lament really, the Ones That Got Away, the buildings I didn't get photographs of and no longer have the opportunity to do so, hence they will probably not be seen now. Which is a pity, because they were some of my nicest work. 

Mostly these were made with and for my much-missed friend Mark Sturmey, who passed away four years ago now after bravely fighting Motor Neurone Disease. Mark had eclectic interests in terms of wargames periods and the models concerned were for the Trojan Wars and the Carlist Wars in the Basque region of 1830's Spain. Some of this was models I made as presents for Mark, some he paid me for and a some we made between us, as Mark was learning to build terrain very skilfully before the cruel condition took away the strength of his hands. Mark's family retained all these models. Anyway, the Trojan things comprised houses and a temple meant to eventually go behind the walls of Troy; it was interesting to research a very different period, There was a lot more Spanish stuff though: a town, a unique Basque farm, a storehouse, wells, wayside crosses and a beautiful baroque church.

Finally, I made some lovely German village units for a friendly customer called Jonathon Marcus, who used to work for the BBC. I think I probably photographed them at the time, but those images never got stored on my PC, so are lost. 

That's my little lament over. Here's Phil's house and I hope to have more stuff for you before many days at all. Cheers.


Tuesday 7 December 2021

Artillery Masters for Perry Miniatures

Hearing in July 2020 that Michael Perry was embarking on a project to produce figures for the Franco-Prussian War of 1870-71 I emailed straightaway offering to build artillery masters. In this case, I can't get much use out of the models for my own armies, because along with Garry Broom I had just completed large forces for the FPW using the old Perrys range from Foundry and they aren't at all compatible. Grrr! I suppose I thought I might be able to make something more historically accurate than is often the case with wargaming models, but my main motive was to be part of a project alongside the Perrys, which I regard as something of an honour.

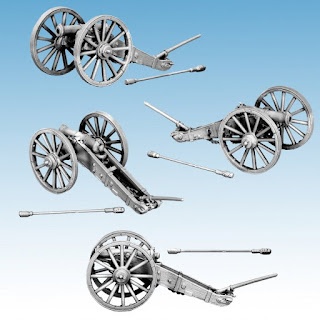
Actually the other Perry was in more of a rush because Alan wanted guns that would go with his Paraguayan War range. Thus the first model you see here is a mountain gun of the French "La Hitte" 1859 system, as sold to Brazil, etc. It was used a little bit in 1871 too. The challenge with this model is it being so tiny: it's like a 15mm gun! All images here are from the Perrys website and Facebook page, by the way.

Then it was on to the main guns for the FPW, starting with the 4-pounder field piece of the La Hitte system. This was straightforward apart from the fiddly details, which you can't see too well on the photographs. What you are seeing by the way is "the resin". Master models built out of styrene cannot withstand the heat or pressure from the vulcanising process of production moulds for metal castings. So they have to be moulded in soft silicone, cast in resin and then the resin version moulded a second time for metal casting.

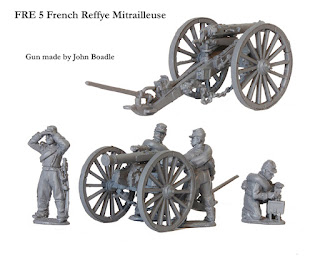
Next we have the mitrailleuse, the improbable early machine gun which didn't find its proper role in 1870, but which frightened the Prussians more than they liked to admit. This was a re-conversion of the 4-pounder master, which you can see gained a whole bunch of weird and wonderful fittings. Oddest of all was the "reloading table", over which a gunner is bent to refill an empty magazine. I loved delving into how the crew actually operated this thing: Victorian technology at its arcane finest. There is a wonderful animated graphic (with sound effect!) here, even though it slightly misunderstands how the magazines were filled: Mitrailleuse Home (victorianshipmodels.com)

Finally we have the Prussian Model 1867 4-pounder, the war-winning weapon alongside its big brother the 6-pounder. I modelled the complicated breech closure as a separate tiny part, but the model as sold comes with different barrels for open and closed breeches. The difficult parts on this are the backrests of the axle-seats. In real life they were just a frame of metal rods, covered in wire mesh, so representing that in a way that will cast whilst not being a great thick lump of a thing was challenging. It took several attempts to get right.

Very shortly I will be starting masters for the remaining two important guns of the war, the Prussian 6-pounder and the French 12-pounder. And that will be it for this project, unless Michael eventually gets as far as Bavarian artillery, because the Bright Blue Army had its very own gun designs.


Monday 6 December 2021

Artillery Master Models for North Star

We have now pretty much come to the end of the models that I built and photographed up to about 2010. I have got quite a few more things on my shelves but they need photographing. I have a camera (thanks to my lovely wife Isla) and have bought an adequate lighting rig, so basically just need to work out how to take decent pictures again, and then be doing that. In the meantime, there's a couple of things yet that you might be interested to see.

Below are North Star artillery models for the Prussian army of the war of 1866 against Austria. Although really retired from commission work, I offered to make the master models for these, as a kind of collaborative project. I wanted a number of each of these gun types for my own Austro-Prussian wargames armies. I could build a master model sure, but the delicate parts would need a level of casting technology beyond what I have myself. North Star were struggling slowly through this range, and if I built the masters they could do the casting (which they are very good at) and I'd even get a little payment for my work. 

Here's the result. The photographs are direct from North Star's website and show the three guns in chronological order. First we have the light bronze smoothbore 12-pounder "shell gun", which was the artillery technology of the 1850's. No longer were solid cannonballs the projectile, but hollow shells with time fuses. The range was about the same as traditional guns, but the piece was very light for the calibre, so actually mounted on the six-pounder carriage of the previous artillery system (Model 1843/ 1856). And there was no longer a need for a couple of short-range howitzers in each battery because every gun could fire shells at high angles. In the form of the "12-pounder Napoleon" this was the most common artillery technology of the American Civil War.

The other two pieces bring us into the next generation, being cast-steel, rifled breech-loaders. The Model 1861 6-pounder came first. It fired a pointed, modern style explosive shell with an impact fuse. The carriage was the same as that of the 12-pounder. Finally we have the Model 1864 4-pounder, of similar technology, but a new carriage including axle seats for two of the gunners (the rest riding on the limber). The massive advantage of these guns was their effective range of more than double the smoothbores. The poor 12-pounders would scarcely get a look-in in 1866 against the Austrian rifled guns.

To model, these were a different challenge to making terrain items. They are proper scale models, detailed within fractions of a millimetre. The wheels are the hardest part, as you might imagine. These guns were made almost entirely from styrene strip, sheet and rod, assembled with liquid poly cement. The most important tool is the digital calliper gauge for measuring. The "chopper" tool is helpful where you want a number of identical parts such as wheel spokes. What came out was historically accurate, but a bit too delicate for casting by the normal methods of the industry. North Star cast these in resin, therefore and sell them as what they call "super-detailed" alternatives to the more basic lead models also in the range. 


Saturday 4 December 2021

A Smaller Project

This was a smaller project, which I did for David Imrie in about 2010, posed here with his excellent Claymore Castings figures. (It's his photographs here too.)The idea was to take some of the Hudson and Allen mediaeval buildings and "tart them up" into village units by painting, adding scenic bases, trees and so on.

The H&A buildings are great to work with. They are produced by a process that's unusual in our hobby, being cast in expending polyurethane foam. Once mixed with its catalyst, this stuff expands fiercely, pressing itself against a strong, fully enclosed mould, producing sharp surface detail. The result is light, hardwearing, reasonably priced and easy to paint. This is the optimum way to produce ready-made buildings for our hobby, in my opinion, much better than resin castings (too heavy and fragile) or laser-cut MDF (totally lacking in surface texture). Unfortunately the method has a higher set-up cost than either alternative and very few people know how to make the moulds. The range doesn't currently have a seller in the UK. In the US I gather the main supplier is the oddly named "Vatican Enterprises".

Anyway, the H&A range is "generic mediaeval" rather than being specific to a particular area. But I can forgive that. I'm a picky man on such matters, but they are so nicely modelled that I forgive them. Normal painting techniques work well on these and I added some details, not all of which are visible in the pictures: I'm sure there was a line of washing and an enclosed gate? I added moss to some roofs, via PVA and very short static grass, drybrushed a bit. The trick with moss on buildings is not to overdo the amount and avoid garish colour contrasts.

By the way, there is rogue building in the bottom image, a very nice little chapel made and painted by Simon Chick. I only supplied advice for that one. It's based on an OO gauge model railway kit by Noch. Simon has mastered the art of picking these up cheap and doing the work which makes them compatible with 28mm gaming. In turn, I had learned that from the late Peter Gilder, a pioneer not least in  wargames scenery.


Friday 3 December 2021

A Mediaeval Tower

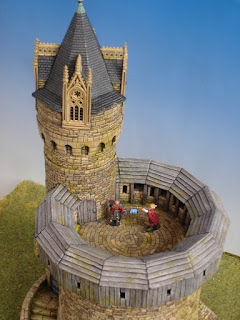
Here's a mediaeval tower I did for Simon Chick (whose photos these are), and it's another of  the models I am proud of. The basis here was the already-nice keep or tower made in hard foam by Hudson and Allen. I improved it in places and added a lot of features large and small: the hoarding round the top, the gothic tower, the palisaded outwork, projections, gun-loops, windows and so on. 

The idea was to make it look like an older structure updated to the tastes of the high gothic period. The tower windows are the strongest feature here. I think I had a model railway church window to start with, then built up gothic frou-frou around and above that before moulding and casting the whole. The painting took a while, as you might expect. looking back I am pleased with the deep shadowing effect where there's a projection. It darkens to almost black, but softly. 

As you can see such a lot of stonework here, it might be a good place to explain how I paint stonework (or tiles, the approach is the same). The starting point is an undercoat of almost black. This is then drybrushed about three times. Each coat is a lighter colour, but also it covers less of each stone than before. Once that's well dried, I pick out some stones in a random pattern, making them variants of the base colour: some browner, some greyer, some yellower, etc. I usually do this with thinned ink or a wash of some kind, so the existing shading remains to a degree. Perhaps 10% of the stones get one colour, 10% another, perhaps 40% altogether. Now you've got a nice "speckled" or "variegated" effect, but a bit garish as yet. The final step is to drybrush a fourth highlight over the whole thing, lighter again in colour and extent. You would think this would look wrong on the stones that are now basically different colours, but in fact this isn't noticeable and it pulls the whole thing together. This technique works, with appropriate colours, for stonework, brickwork, clay tiles, wooden planks or shingles. Just don't do it with slates, because the colour is much more uniform on a slate roof. You will see the technique on a lot of my later models.


Thursday 2 December 2021

German Town Wall Again

This is a set of German town walls I made for David Imrie in 2006. Apologies for the distracting background to these photographs: too much blue sheet and too much of my old back garden in Coventry! The dull light also reminds me now of being up at dawn that day, between an all-nighter to finish the model and driving to the Partizan show to hand it over. Anyone who makes models will be familiar with being up all night to finish a model before a deadline. It is an iron law, somehow, that every model always takes longer than you expect: sometimes only a bit longer, sometimes twice as long. But there's a satisfaction in hanging in there and getting the job done. Anyway the final photo here was taken recently by Dave himself and shows the benefit of a proper foreground, a proper background and some nice figures to set the model off.

As you can see, this project comprised a gatehouse, three round towers and four lengths of wall, one with a stairway. The usual techniques and materials have been used: foamcard, balsa, Wills sheets and resin cast parts. There were some big castings here: the roof of each wall section is cast as one piece, as are the tower roofs.

When I look at this now, I can see a lot of difference from the similar model I made for myself almost twenty years earlier. This one is a lot "crisper", as modelmakers say, by which we mean neater, cleaner and more sharply defined. You can see what material every part is supposed to be made of. I like the colour better too, as it's atmospheric and pleasant without being garish


Wednesday 1 December 2021

The Dresden Villages

In the mid-2000's I made some models for US wargamer Matt Pavone, who was keen to refight the Battle of Dresden, 1813. I did a lot of research and we had all kinds of plans to build the Gross Garten park, the old city walls, even the famous palaces and churches of that spectacular city! But in the end we only got as far as a series of four village units, which you see below. I also used one as the header photograph for my blog, as I thought it gave an instant idea of what it is about.

The design of each village unit in this case was to be a single piece with room for one of Matt's 16-figure infantry units to fit on the base. Within that, I wanted to make the layout of each unit different.  These aren't Matt's figures you see here by the way, but those of my lifelong wargames accomplice Garry Broom, who has thousands of figures for this period and adds hundreds more every year. One day we'll even get round to having a game with them!

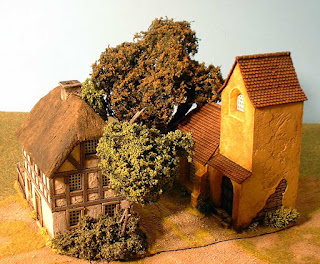
Anyway, these villages were based on proper research into the style of "vernacular" buildings in Saxony, rather than just being "generically German". In this area it was common for buildings to have their ground storey made of field stone, with the upper floor being timber-framed. As in many places the appearance of the churches depended at least as much on when they had been built as on any local style preference. This simple structure would have been built in the early Middle Ages, and could be almost anywhere in Germany, although the rather bright ochre colouring is common around these parts. Oddly, the fences weren't altogether generic. Wicker and vertical-plank fences exist across Germany, but the horizontal-plank version was most typical of Saxony and Brandenburg.