Monday 7 February 2022

Russian Village

Here we go with the last of the Russian stuff and then it will be on to pastures new.

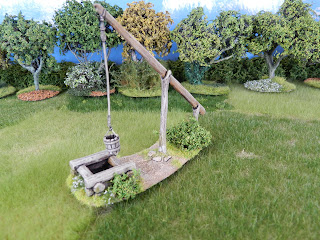
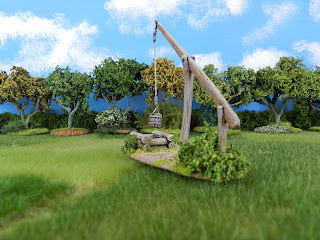
This and the next image are of the type of well called a "well sweep", typical of parts of Russia, but common in many areas of the world. There is no rope or handle; instead the bucket is connected by a stick to a large counterbalanced beam, pivoting on a fork-shaped upright. The user grabs the stick and pulls it down until the bucket takes in water and then lets the counterweight do most of the work of pulling it up. Obviously this kind of well only works in places where the water table is close to ground level.

This pic illustrates what I immediately noticed was the downside of my lovely new photographic backdrop: the long static grass looks lush and natural. but doesn't give under the slight weight of models placed on top of it. Hence they seem to "float" on the tips of the grass, emphasising the edge of the base, which I would much prefer not to notice. I'm not a big user of emoticons, but 😖. I was thinking of building my wargames board with a static grass finish, but it's back to the drawing board on that one...

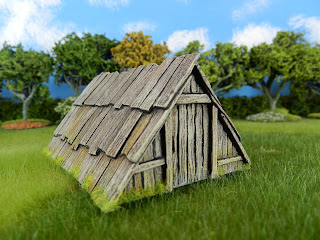
I didn't make this store/ shack myself, just painted it. It's really only here for completeness.

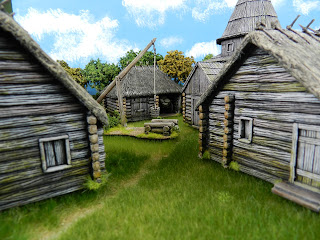
And finally two pictures of the village assembled.

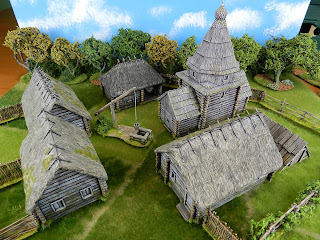
And to finish today's festival of self-deprecation, I notice this shot reveals the "edge of the sky". But if I crop that out, you wouldn't see how the fence elements can be arranged to suggest individual plots behind each house, so I'll leave it. Never mind.

In a few days I will be photographing some models from a very different place, so I'll see you all (virtually) when they get posted.


Saturday 5 February 2022

Russian Church

Here's the largest of the Russian buildings I made. Some were much more elaborate but this is typical for a Russian village from the Middle Ages to the twentieth century. It's built almost entirely from balsa wood. This one's a little larger than I usually like to make and the walls consumed an outrageous amount of balsa dowel: I think it was twelve metres, £30-odd's worth, and that was years ago. But it goes together easily enough with a bit of patience. I described the technique in the comments on the Russian houses. 

A wargaming friend asked me very recently how I paint the aged woodwork, so this might be a good place to explain. Firstly you need to get a very thorough undercoat of matt black over every millimetre of the surface, making sure you get into the cracks and crevices and checking from every angle. Then it's mostly careful drybrushing with a big flat bristle brush. I learned the concept of this colour sequence from an article by Dave Andrews in White Dwarf long ago:

  1. Dark brown, applied quite heavily, leaving black mostly just in the cracks.
  2. Medium grey-brown, somewhat more lightly applied
  3. Light grey with a touch of buff, sand or whatever mixed in. This is a light drybrush only.
  4. Wash over some individual logs or planks to vary the colour. Well-thinned inks, or washes by GW or whoever: black, dull and bright browns are what you want.
  5. Final very light drybrush with a pale silver-grey colour.
  6. I often also add a hint of moss with very thin olive-green, spotted on randomly and immediately softened by dabbing with a damp ball of tissue.
The dome and cross of this model (see final photo) are the bits I am proudest of. The pointed shingles were cut from thin styrene sheet, textured with rough sandpaper dragged forcefully down it. They are applied in a pattern I learned from peering closely at photos of real examples. The trick on the dome is to vary the width of shingles in each row. So the first row at the bottom of the "onion" are a medium width, each of the next two rows a little bigger, then reducing in size again up to the top. The shingles on the flat sections of spire start with the biggest size and gradually reduce. 

The area of Coventry where I live is home to minorities from around the world, one of them being Orthodox by religion. I've often noticed the unusual three-branched cross on their church, thinking it would look interesting on a model. But it had to have as much strength as I could give it, being a delicate thing in a place vulnerable to accidental damage. I thought about wood and plastic, but they would just break if it gets caught hard. So I resolved to do a bit of metalwork. I marked out the shape on a sheet of 0.8mm brass, using strips of masking tape, then clamped it firmly in the vice. Using a fretsaw I cut it out, tidying with a square-section file and rounding off the ends with a flat one. After a couple of tries it came out a bit thinner than I'd intended, but got the shape OK. Hopefully, if it gets caught it will at least bend or pull out as in one piece rather than breaking.  


Thursday 3 February 2022

Russian Village Fences

Today's instalment of rustic Russian stuff consists of  some fencing I made in styles characteristic of the area from ancient times to the twentieth century. I researched them mostly from a photographic survey of rural Russia in about 1910, which is easily found online. Surprisingly, these quite early photographs are in colour. I picked out three of the more interesting and atmospheric styles they revealed for my models. 

This first type was a loose version of wicker/ wattle fence. I made the uprights of all these pieces from twigs I'd got from the flower arranging department of the craft shop sometime over the years, as they were adequately strong and rigid. They are glued into holes drilled in a strip of mounting card and then glued onto a second wider strip. When dry I went over these bases with filler and sand, producing a nicely rounded effect with a textured surface, in the same way as I base my figures. The thinner interwoven strands were made from the bristles of a yardbrush, which I have been very slowly scalping over the years. Note that this is the kind of yardbrush made of natural materials (in fact split cane and palm fibres), not the ones with plastic bristles. I like to say these fences are "made of real wicker".

The second fence variety was this interesting "sideways" approach to wattle, which I haven't seen elsewhere. I made it the same way, although it involves a middle stage of adding horizontals between the fence posts, made from thicker bristles superglued on, then with thin cord wrapped around the joints and set with more glue. The vertical sticks are then added one by one, each going the opposite way to its predecessor. I painted over the joins with thinned PVA to hold everything rigid. It was one of those laborious modelling jobs which repays you by looking rather good in the end.

When it came to painting, the materials were in fairly natural shades to start with. I washed over the fences with dark Games Workshop-type washes, then drybrushed with pale grey, finally washing a few of the sticks again in different colours for interest.

Finally here's a third style, which is similar to one type of American log fence. As you see, I added bushes growing between the strands of fence, which I think adds a pleasing touch. All these fence sections were made as "L" shapes, so that they stand up easily, with only a few short straight sections. More often I model fences as part of the perimeter of a "village unit", but in this case the aim was mainly skirmish gaming. So my plan was for these to be set up in freestanding ways while still useable surrounding a defined village area for a unit game. 

Tuesday 1 February 2022

Laser-Cut MDF Kits

When making the Russian village stuff I worked on two laser-cut MDF kits, which Garry Broom had been given by our late friend Mark. They are by 4Ground and only just about compatible size-wise with what I'd already made. I'm not a massive fan of MDF kits, to put it mildly, but thinking they'd be good for the skirmish end of what we wanted from these Russian buildings, I was determined to do what I could with them. I think laser cut stuff works best when aiming to represent wooden buildings and least well in any attempt to model tiles, slates, etc. In this case, they are wooden buildings with a bit of crumbling render, so not too bad. 

I worked on them by first of all trying to add to the wood grain on the roof, scoring a bit more texture with super-rough sandpaper, although I'm not sure this added very noticeably. I plugged the hideous locating holes and lugs in the roof with green stuff. I remodelled the rendered areas using household filler in my usual way. I left off the useless porches and lean-to's which just increase the already huge footprint without adding anything useful. And although these are sold as "pre-painted", I completely repainted the kits to pull them closer in style and colour to my own models. I think they've come out useable in the end, at least for skirmish gaming and they have featured in one or two Chain of Command WWII games.

At the risk of labouring the point, these are awfully big. Perhaps a 28mm Russian peasant would be delighted to enjoy such spacious accommodation, but I have a bit of thing against over-large wargames buildings. You can see the comparative size in the last photo. The first building is about my usual size. The mashed up plastic kit one in the middle has a footprint over 50% bigger and the MDF one is 130% bigger. I could get a village in that space!